It was a typical Saturday afternoon when I decided to tackle my driveway with my trusty power washer. I leaned in a bit too eagerly, thinking I knew all the tricks. A sudden spray of high-pressure water kissed my pristine siding—and left a faint but unmistakable streak. That moment, I realized I had just made a mistake that could leave scars for years to come.
That experience was my wake-up call. Power washing is one of those tasks where a tiny slip-up can turn into long-lasting damage. For years, I believed that just owning a good power washer was enough. But I soon learned that the devil is in the details—specifically, the nozzles we choose and how we use them.
Why Power Washer Nozzle Mistakes Can Haunt You for Years
What surprised me initially was how something as simple as a nozzle can wreck your surfaces—think cracks in wood, stripped paint, or permanent scars on your siding. And it’s not just cosmetic; improper nozzle use can also weaken the material, making your home more vulnerable in the long run. According to a 2024 guide on power washing, the right techniques involving proper nozzle selection are crucial for protecting your surfaces and ensuring durability.
Let’s face it: this is a mistake many beginners make. They jump into the task, relying on casual advice or outdated info, and end up causing more harm than good. I’ve been there, and I want to help you avoid those pitfalls. Whether you’re prepping for a big project or just want to refresh your understanding, recognizing these common nozzle errors can save you time, money, and frustration.
Ready to discover which nozzle mistakes are most harmful—and how to avoid them? Good. Because understanding and fixing these errors will not only make your cleaning more effective but also protect your investment for years to come. If you’ve ever faced similar setbacks, you’re not alone. And trust me, the expert tips I’ll share are backed by real-world experience and proven strategies.
Is it really worth sweating over nozzle choices? Absolutely.
I once tried using a junk nozzle for every job, thinking it didn’t matter. Spoiler: It does. Choosing the right nozzle—like those listed in our effective equipment guides—can dramatically change your results. Skimping on this simple but critical step can cause scars that are stubborn and costly to repair.
Now, if you’re wondering how to prevent these mistakes from happening, stay tuned. We’ll walk through the top errors to watch out for and how to fix them with proven, practical techniques. Trust me: when it comes to power washer nozzles, knowledge is your best tool—and your best defense against permanent damage.
Choosing the correct nozzle is like selecting the right paintbrush; each has a purpose that affects your outcome. For example, a 25-degree nozzle is great for wide-area cleaning, while a 0-degree nozzle packs a punch for stubborn grime—but using it on delicate siding can cause damage. To get familiar with your equipment, check our equipment guide, which covers nozzle types and their best applications.
Gather your tools and prep properly
Before starting, inspect your power washer and accessories, ensuring everything is in order. Wear protective gear—gloves, goggles—and clear the area. I remember one chilly morning when I thought I could skip gloves; I paid the price with a sprayer-shocked hand and a lesson learned—the importance of preparation.
Adjust Pressure to Match Surface Sensitivity
Setting the right pressure is vital. Too high, and you risk gouging surfaces; too low, and you won’t clean effectively. Think of it as tuning a guitar—too tight or loose, and the sound (or in this case, your clean) won’t be right. For siding, I dialed the pressure down and reduced the nozzle angle for a softer spray, preventing streaks and scars.
Test on a small area first
Always test your spray on an inconspicuous spot to see how the surface reacts. This step is like a sample bite before a meal—it’s better to be cautious at first, especially on sensitive materials like wood or vinyl siding. After my initial test, I adjusted the pressure slightly downward, which resulted in a spotless finish without streaks.
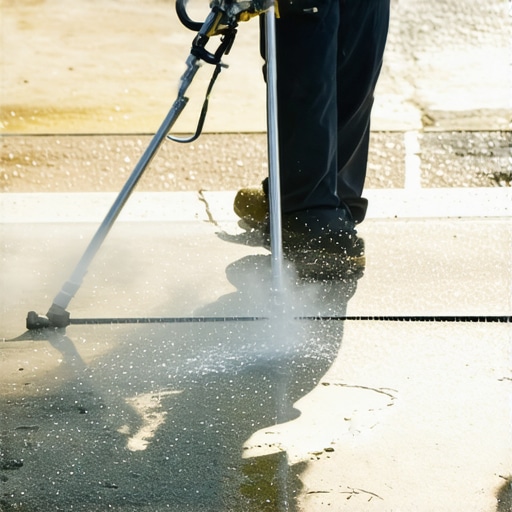
Maintain Proper Distance and Technique
Keep the nozzle about 12-18 inches from the surface. Moving closer can cause damage, especially with higher-pressure nozzles. I remember bouncing the nozzle too close to my deck once—I caused splintering in the wood, and it was hours of repair. Practice makes perfect: hold the wand steadily and sweep in overlapping passes to avoid streaks and missed spots.
Use consistent sweeping motions
Imagine you’re painting a wall—you want even coverage. Same with power washing: move your wand smoothly in a controlled, sweeping motion, never lingering in one spot. This rhythm prevents localized damage and ensures uniform cleaning.
Adjust Nozzle and Pressure for Different Surfaces
Soft surfaces like painted wood or aged siding need gentler settings. Think of it as cleaning with a gentle breeze instead of a gust. For these, switch to a wider spray angle and lower pressure. Conversely, stubborn grime on concrete can handle the high-pressure, narrow-angle nozzles. Remember, the key is matching the tool to the surface.
Switch nozzles strategically
Use your 40-degree nozzle for general cleaning and switch to a 15-degree or zero-degree for tougher spots. Change nozzles carefully and clean them after use to prevent clogging, which can affect spray patterns and lead to damage if ignored. Proper maintenance is critical for longevity and safety.
Keep Moving and Keep Focused
Never stay in one spot for long—it’s like holding a blowtorch in one place. Continuous movement prevents damage, especially when cleaning delicate surfaces. During a recent project, I kept my wand moving constantly, and the results were perfect—clean, streak-free, and intact.
To maximize your effectiveness, progress systematically and stay focused on your technique. For more advanced tips and strategies, check out our power washing techniques guide. Mastering these core steps ensures safe, efficient, and professional-quality results every time.
While many believe selecting a powerful, high-pressure power washer is the key to spotless surfaces, this notion overlooks a crucial aspect: the technique and understanding of surface-specific nuances. Contrary to popular advice, using the strongest setting isn’t always beneficial, especially without considering the material sensitivity. This misconception often leads to irreversible damage, such as gouged wood or streaked siding, which could have been avoided with a more nuanced approach.
Many assume that a larger pump or a more aggressive nozzle guarantees better results. However, in my experience, this can be a trap. A study from the 2024 cleaning techniques guide emphasizes that optimal results come from balancing equipment power with appropriate techniques—pressure, nozzle angle, distance, and timing—tailored to each surface. Ignoring these details is a common mistake that often yields subpar or damaging outcomes.
Here’s a secret: many power washers have adjustable settings, yet users default to maximum pressure on every surface, thinking it’s the best way. But this ‘more force equals better cleaning’ fallacy can backfire. For delicate surfaces like painted wood or aged stucco, using a lower pressure with the correct nozzle is not just smarter; it’s essential. The key is to understand the surface’s vulnerability and adjust accordingly, a skill that separates amateur from professional cleaning.
What Advanced Power Washing Strategies Do Experts Use to Protect Surfaces?
Experts recognize that surface conditioning and cleaning technique matter as much as the equipment itself. For instance, they often pre-treat stubborn stains with eco-friendly solutions before any high-pressure work, reducing the need for brute force. Moreover, they utilize variable pressure units and specialized nozzles designed for different surfaces, maximizing efficiency while minimizing risk. This approach is detailed in advanced guides, like the effective equipment and strategies article.
Another nuanced technique involves understanding the angle of spray—aiming the nozzle at the right distance and orientation so that the force cleanly removes dirt without damaging the substrate. For example, using a 40-degree nozzle for broad, gentle coverage contrasts sharply with a 0-degree nozzle for stubborn patches—each requiring a different approach. The importance of this in achieving professional results is often underestimated by beginners.
To truly elevate your power washing game, it’s vital to combine proper equipment with sophisticated technique—matching nozzle type, pressure, and distance to the specific surface and stain type. This isn’t just about having the right tools; it’s about mastering the art of surface-specific cleaning strategies. For more insights on achieving trustworthy results, check out our proven techniques guide.
Have you ever fallen into the trap of overestimating your equipment and underestimating surface nuance? Share your experience in the comments—I’d love to hear your stories and help you refine your power washing approach.
Keeping Your Power Wash Equipment Ready for Action
Investing in high-quality equipment is only half the battle; the real challenge lies in maintaining it for optimal performance over time. Personally, I swear by regular inspections, which involve checking hoses for cracks, fittings for leaks, and ensuring nozzles are free of clogs. Doing this every few uses prevents small issues from snowballing into costly repairs. For a comprehensive approach, consult our effective equipment guide to maximize your maintenance routine.
Daily Care and Cleaning
After each session, I like to flush out the system with clean water, removing any residual detergent or debris. This simple step greatly extends the lifespan of pumps and valves. Additionally, I dry the nozzle tips and store the equipment in a dry, sheltered area. This level of care ensures my power washer performs reliably, season after season. Adopting similar habits can make a big difference, especially for those looking to build a dependable power wash setup that lasts.
Choosing the Right Tools for Longevity
When selecting accessories, durability matters more than price. For example, I prefer stainless steel fittings over plastic ones because they resist corrosion and stand up to wear. Similarly, investing in a quality hose reel prevents kinks and reduces the risk of leaks, keeping the system efficient. Using top-tier tools, as discussed in our recommended equipment articles, ensures you won’t be replacing parts prematurely.
Upgrading Tools to Keep Up with Trends
The future of power washing points towards smarter, more durable tools. Innovations like pressure sensors that alert you to leaks or blockages are gaining popularity. I anticipate that by 2025, we’ll see tools equipped with IoT capabilities that monitor system health and suggest maintenance tasks remotely. Staying ahead means choosing equipment that can integrate with these advancements now—think of it as future-proofing your investment. For a look at cutting-edge options, explore our latest tech reviews.
How Do I Maintain My Power Wash Over Time
Regularly inspecting your system, using quality replacement parts, and scheduling routine service with authorized technicians can dramatically prolong your equipment’s life. Don’t forget to follow manufacturer guidelines on lubrication and fluid replacement—these small steps prevent corrosion and mechanical failures. For example, I schedule biannual professional checkups, which catch issues early and keep my systems running smoothly. Implement these practices, and your investment in a power washer will pay off with consistent, professional-quality results each time you use it.
If you haven’t already, try delaying nozzle switching during your next session; selecting the correct nozzle for each surface coupled with proper pressure settings can significantly improve results while extending the life of your equipment. Mastering this technique ensures you’re making the most of your gear and reduces wear and tear over time.
Lessons That Changed My Approach to Power Washing, Power Washer, and Powerwash
I learned the hard way that rushing to finish a project often leads to missed spots or damage; slow, deliberate movements produce better results and protect surfaces.
Overestimating my equipment’s power made me overlook surface sensitivities, causing costly repairs. Now, I focus on matching pressure and nozzle to each surface for optimal results.
Underestimating the importance of pre-treatment for stubborn stains was a mistake; incorporating eco-friendly solutions dramatically eased cleaning and extended equipment lifespan.
My Go-To Gear and Resources for Power Washing Success
Effective Equipment Guide: I trust this comprehensive resource because it breaks down tools and accessories that improve efficiency and durability, based on real-world testing.
Power Washing Techniques Guide: This manual offers proven methods and step-by-step instructions that elevate my results beyond basic cleaning.
Top Equipment Reviews: Keeping up with the latest gear ensures I use reliable, innovative tools that save time and effort.
Pro Power Wash Strategies: Learning from industry experts helps me avoid common pitfalls and achieve professional-quality results at home.
Seize the Power and Transform Your Space Today
Remember, mastery of power washing, power washer, and powerwash techniques isn’t just about equipment—it’s about applying the right strategy with confidence. With patience, the right tools, and a focus on surface-specific care, you can achieve stunning results that last. Take the first step now, and watch your home’s curb appeal flourish.
What has been your biggest challenge when working with power washers? Share your story and tips in the comments below—I’d love to hear your experiences and help you get the best results possible.