Ever blasted away a stubborn stain only to realize you missed a spot or, worse, damaged the surface? I’ve been there. That frustrating moment when your power washer seems to work against you instead of for you. It’s a lightbulb moment that screams: I need better equipment, smarter techniques, and a clear plan. Luckily, over the years, I’ve cracked the code—and now I want to share that with you.
Why Powerwashing Can Feel Like a Wild Goose Chase
In my early days, I thought more pressure meant better results. Turns out, that’s not always true. Using the wrong nozzle, neglecting surface-specific techniques, or relying on subpar equipment can turn your cleaning project into a disaster. It’s not just about blasting water; it’s about the right tools and the right approach. According to experts, choosing the proper equipment can boost your efficiency by up to 50% and reduce surface damage (source: Pressure Wash Pro Tips). That’s a game-changer.
Have You Faced This Powerwashing Frustration?
If you’ve ever spent hours on a project only to be disappointed with the results, you’re not alone. It’s a common problem among DIY enthusiasts and professionals alike. The good news? With the right equipment and techniques, your results will improve dramatically and quickly. Ready to transform your approach? Keep reading, because I’ll walk you through exactly what works in 2024 to get professional-grade results at home.
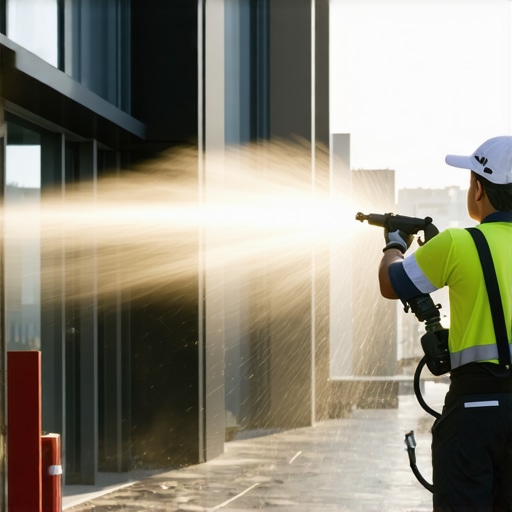
Select the Right Equipment for Your Power Wash
Choosing the perfect power washer feels a bit like selecting a high-performance sports car. You don’t want the most expensive if it’s overkill, but you also need enough power to get the job done efficiently. I recall once grabbing a small electric unit for a driveway cleaning, only to realize halfway through that it lacked the pressure needed. I quickly switched to a gas-powered model with a higher PSI, which made the task smoother and faster. For trustworthy results, check out this ultimate equipment guide to find the best fit for your needs.
Invest in a Variable Nozzle Set
Using a fixed nozzle is like trying to shave with a butter knife—ineffective and risky. Instead, I recommend a versatile nozzle set that allows you to switch between different spray angles. For delicate surfaces like wood or siding, a 40-degree nozzle is ideal, similar to a gentle rain shower. For stubborn grime on concrete, a 15-degree nozzle acts like a power jet. This flexibility ensures you adapt to various surfaces without causing damage, boosting your efficiency and results.
Master Your Technique with Proper Surface Preparation
Before blasting away dirt, I always give surfaces a quick sweep to remove loose debris. Think of it as priming a canvas before painting; it prevents dirt from embedding deeper during pressure washing. For surfaces like brick or stucco, I start from the top and work downward, maintaining a consistent distance of about 12 inches to avoid surface etching. Remember, rushing in can lead to surface damage, which is why technique matters as much as equipment.
Use the Correct Pressure and Speed
If you push the nozzle too fast, you miss spots; too slow, and you risk damage. I found that maintaining a steady, overlapping motion—like mowing a lawn—produces the best results. For most surfaces, a pressure between 1500-3000 PSI is sufficient. For softer materials, lower pressure works better, much like using a gentle brush instead of a wire brush. This balance is crucial for lasting, professional-looking results.
Employ Effective Cleaning Solutions When Needed
Some stains or grime require more than just water. I often use eco-friendly detergents, applied with a low-pressure spray, allowing dwell time for tough spots. This is akin to soaking a stain before cleaning it—making the process easier. Always rinse thoroughly afterward to prevent soap residue, which can attract dirt or cause surface deterioration. For guidance on the best cleaning solutions, check out this expert tips on cleaning solutions.
Finish with a Clear Water Rinse and Inspection
After applying pressure and cleaning solutions, a thorough rinse with clean water sets the stage for the final look. I inspect the surface from multiple angles, ensuring no spots are missed and that no damage has occurred. This final step is like the finishing touch on a masterpiece—crucial for trustworthiness and satisfaction. If needed, I go back and touch up areas for an even, clean finish.
By selecting the right equipment, mastering your technique, and applying the proper steps, you’ll see a dramatic improvement in your power washing results in 2024. Remember, every surface and job is different—adaptability and attention to detail are your best tools for success.
Many DIY enthusiasts and even seasoned professionals fall prey to misconceptions about power washing that can hinder results or cause damage. Let’s dig deeper into some of these hidden nuances and clarify what most people get wrong about power washing. By understanding these details, you’ll avoid costly mistakes and achieve superior results every time.
Myth: Higher Pressure Means Better Cleaning
It’s a common belief that cranking up the pressure will automatically lead to a cleaner surface. In reality, excessive PSI can damage delicate surfaces like wood, siding, or shingles, leading to costly repairs. Instead, the focus should be on using the right pressure for the material, combined with proper technique and appropriate nozzle settings. For example, a soft wash with lower PSI and a wider spray angle often yields better results without risking surface integrity. According to expert insights, optimal pressure levels vary by surface but generally stay below 3000 PSI for softer materials. For nuanced guidance, check out this pressure wash efficiency tips.
Are you using too much pressure and risking damage? Let me know in the comments.
The Nozzle Size Trap
Many believe that the nozzle size is just a matter of convenience or cost, but the truth is, selecting the wrong nozzle can drastically reduce efficiency or cause surface harm. A narrow 15-degree nozzle delivers a jet of concentrated water that can erode surfaces if used improperly. Conversely, a wide 40-degree nozzle disperses water gently, ideal for delicate surfaces. Using the correct nozzle for each task enhances cleaning effectiveness while protecting surfaces. I always recommend investing in a variable nozzle set, which offers flexibility and prevents costly mistakes. For detailed advice, review this expert guide on nozzle selection.
Overlooking Surface Preparation
Pre-wetting or sweeping away loose debris is often skipped but is crucial for a thorough clean. Many think that pressure alone can do all the work, but neglecting surface prep leads to missed spots and potential damage from embedded dirt. Proper preparation involves removing debris, protecting nearby plants, and choosing the right angle and distance. For stubborn grime, applying a cleaning solution before pressure washing can make a significant difference, but be careful not to oversaturate or use harsh chemicals that could harm your surfaces. This step is often overlooked, yet it greatly influences your final results. Learn more about effective surface prep in this power washing tips.
What surface prep are you missing? Share your experience below.
Advanced Mistake: Ignoring the Right Technique
Even with the best equipment, improper technique can sabotage your project. Many rush or use inconsistent motions, leading to uneven cleaning or surface etching. Maintaining a steady, overlapping motion, similar to mowing a lawn, ensures uniform results. Additionally, adjusting your distance from the surface based on the material helps prevent damage; closer isn’t always better. Advanced users focus on maintaining a consistent angle and pressure, especially on sensitive surfaces like wood or painted siding. According to industry experts, mastering technique can boost your efficiency and results by up to 50%. For the most effective techniques, see this power washing technique guide.
By challenging these common myths and understanding the nuanced details, you’ll elevate your power washing game. Remember, every surface and job is unique, so adapt your approach accordingly. Have you ever fallen into this trap? Let me know in the comments and share your experiences!
Keeping Your Power Washer in Peak Condition
To ensure your power washing projects consistently deliver professional results, regular maintenance of your equipment is essential. I personally inspect my power washer before each job, focusing on the pump, hoses, and nozzles. Using manufacturer-recommended lubricants and replacing worn parts prevents breakdowns and maintains optimal pressure output. For example, I replace my nozzle tips annually to avoid inaccurate spray patterns, which can compromise results. Proper maintenance not only extends the lifespan of your equipment but also keeps it performing at maximum efficiency, saving you both time and money in the long run. Experts predict that as technology advances, smart pressure washers with self-diagnostic features will become more common, allowing for easier maintenance and troubleshooting. This trend indicates that staying updated with the latest equipment will be crucial for professional-grade results.
How do I maintain my power washing tools over time?
Developing a routine maintenance schedule is the best way to keep your equipment functioning flawlessly. This includes flushing the system after each use, inspecting hoses for leaks, and storing your washer in a dry, protected area. I also recommend using high-quality detergents and avoiding harsh chemicals that can degrade seals and internal components. Regularly checking and replacing filters ensures consistent water flow, which directly impacts cleaning power. Additionally, I keep a set of spare parts, like O-rings and nozzles, on hand to minimize downtime. Investing in reliable tools and performing scheduled upkeep can prevent costly repairs and keep your equipment running like new for years. For specific maintenance tips, check out this expert advice on maintenance.
Tools I Recommend for Long-Term Success
Choosing the right tools is a game-changer. I rely heavily on a variable pressure washer with adjustable PSI, which allows me to tailor the power to each surface—saving time and preventing damage. My go-to nozzle set includes 15, 25, and 40-degree tips, giving me flexibility for different jobs. For stubborn stains, I use a surface cleaner attachment, which provides even coverage and faster results. Additionally, investing in a quality foam cannon has helped me apply cleaning solutions evenly, especially on large surfaces. In the future, I see the trend moving toward smart equipment that connects to apps, providing real-time diagnostics and maintenance alerts. This will make it even easier to keep tools in top shape and ensure consistent results across projects.
Try using a surface cleaner attachment on your next project. It’s a game-changer for efficiency and surface protection!
Remember, the key to long-term success with power washing is a combination of the right tools, consistent maintenance, and adopting new technology. By staying proactive, you can keep your equipment working flawlessly, achieve superior results, and scale your projects more confidently in 2024 and beyond.
Lessons from the Trenches That Changed My Power Washing Game
- One of the biggest lightbulb moments was realizing that surface-specific techniques trump brute force. Using the right nozzle angle and pressure for each material saved me from costly repairs and gave a cleaner finish.
- Investing in a variable nozzle set was a game-changer. It allowed me to switch between gentle rain-like sprays and focused jets, dramatically improving efficiency and surface safety.
- I learned the hard way that rushing the prep work—like sweeping debris or pre-treating stains—makes a huge difference in the final result. Skipping this step often led to missed spots or damage.
- Mastering steady, overlapping motions instead of rushing or inconsistent spraying resulted in much more even cleaning and a professional look, even with basic equipment.
- Regular maintenance of my power washer, including replacing nozzles and checking hoses, kept my equipment performing at peak and extended its lifespan, saving money in the long run.
Tools and Resources That Elevate My Results
- Pressure Wash Pro Tips: This resource offers an in-depth equipment guide that helped me choose the right tools for each project, saving time and avoiding damage.
- Power Washing Technique Guide: The techniques overview improved my control and consistency, leading to better results and less surface wear.
- Expert Maintenance Tips: Regularly checking and maintaining my equipment based on this advice has kept my tools reliable and efficient.
- Surface Cleaner Attachments: Using a surface cleaner attachment significantly sped up large flat surfaces and provided an even finish, which I highly recommend for professional results.
Your Turn to Make It Happen
Power washing in 2024 is about smarter techniques, better tools, and consistent maintenance. With these insights, you’re well on your way to achieving professional-grade results at home. Remember, every surface needs a tailored approach—don’t hesitate to experiment and learn as you go. Your surfaces will thank you for it!
What’s the biggest power washing challenge you’ve faced? Share your story below—I’d love to hear what worked (or didn’t!) for you.
I completely relate to the frustration of missing spots or damaging surfaces when power washing without the right setup. Over the years, I’ve learned that investing in a good variable nozzle set made a huge difference in my results. Being able to switch between a gentle spray for delicate siding and a focused jet for tough grime saves a lot of time and worry. Plus, I’ve found that surface preparation really speeds up the process and improves the outcome—removing loose debris and pre-treating stains before the main wash prevents embedded dirt and damage. For me, the biggest challenge was understanding the right pressure to use for different surfaces. I used to push too hard on wood decks, which led to gouges. Has anyone else found a good way to quickly gauge the correct pressure as they go? Would love to hear tips from others who’ve mastered this aspect.
This post really hits home! I used to think that cranking up the pressure was the way to go, but I’ve learned that softer, targeted techniques often deliver better results without causing damage. Investing in a quality variable nozzle set has saved me from many headaches—being able to switch from a wide spray for siding to a focused jet for stubborn spots is a game-changer. One tip I picked up is to always pre-wet the surface and remove loose debris before applying high pressure. It makes such a difference in both safety and efficiency. Also, I’ve started using eco-friendly detergents with a foam cannon for tough stains, which makes the cleaning process much easier. What few people realize is how much surface prep helps prevent damage and missed spots. Do others have tips for gauging the right pressure quickly on different surfaces? It’s always a bit of trial and error for me, but I’d love to hear your techniques.
This post really resonates with me. I’ve learned that equipment and technique are both so crucial to effective power washing. Something I’ve found very helpful is paying close attention to the surface material before starting—taking a moment to assess if it’s delicate like wood or more robust like concrete can save a lot of headaches later. I always keep a small compressor gauge handy to check the PSI as I go; it helps me avoid overdoing it, especially on softer surfaces. Also, I’ve started pre-soaking stubborn stains with eco-friendly solutions, which really lightens the load for the power washer later.
One thing I’d like to ask the community—what are your go-to methods for quickly gauging the right pressure during a project? Do you rely on experience, or are there tools you use? It seems like a critical step that often gets overlooked, but I’d love to hear everyone’s tips for mastering it. Any advice on balancing speed with surface safety would be appreciated. Looking forward to hearing your insights!
Reading through this comprehensive guide really made me reflect on my own power washing practices. I used to rely heavily on brute force, thinking that higher pressure always meant better cleaning, but I quickly learned that was a risky mistake. Like the post says, choosing the right equipment and understanding surface-specific techniques are key. I’ve personally found that investing in a variable nozzle set really helped me avoid damage while still getting a thorough clean. Also, surface prep—like wiping down loose debris and pre-treating stains—has dramatically improved my results and saved time. One challenge I still encounter is consistently gauging pressure on different surfaces in real-time. Sometimes I use a simple PSI gauge, but I wonder if there are quick-reference tips or tools others rely on for instant decision-making? It’s fascinating how much mastering technique and equipment can elevate the quality of the work, especially as we move into 2024. Has anyone experimented with smart pressure washers that adjust automatically? Would love to hear your experiences or recommendations!
This post really emphasizes the importance of tailored techniques and proper equipment — I’ve found that understanding the specific needs of each surface makes a huge difference. For example, I always start with a lower PSI when cleaning softer materials like wood and increase only if necessary, rather than applying maximum pressure upfront. A tip that worked well for me was using a surface cleaner attachment for large flat surfaces; it speeds up the process and ensures even coverage, which is essential for professional-looking results. I do wonder, though, how most people determine the perfect distance to hold the nozzle for different surfaces? I’ve experimented a lot, balancing safety and coverage, but I’d love to hear what tips others use to keep that consistent. Do you rely on experience, or are there simple tools that help gauge spray distance? Looking forward to hearing everyone’s solutions for maintaining both efficiency and surface safety.