It was a sunny Saturday morning when I finally decided to tackle my permeable pavers. I wanted that pristine, inviting look to impress guests. Armed with my trusty power washer, I began, only to realize halfway through that something was terribly wrong. Water started pooling, the surface wasn’t as clean as I imagined, and worst of all—my pavers looked worse than before. That frustrating moment made me wonder: am I doing something wrong?
Many homeowners like you and me face this exact dilemma. Power washing promises a sparkling driveway and clean outdoor spaces, but with permeable pavers, it can quickly turn into a clogging nightmare if you’re not careful. Over time, debris, dirt, and organic matter can seep into those tiny pores, leading to blockages that undermine drainage and durability. Traditional power washing techniques? Not always up to the task.
Today, I’ll share five proven strategies I’ve discovered to powerwash permeable pavers effectively without risking clogging. These tips aren’t just based on theory—I’ve tested them myself, and they’ve saved my driveway from a costly redo. Plus, I’ll point you toward some essential equipment and eco-friendly cleaning methods that keep your pavers looking new.*
Why You Should Rethink Powerwashing Permeable Pavers
Power washing is an incredible tool for maintaining your home’s curb appeal. However, permeable pavers are a different beast. Their open, porous structure is designed for drainage—a great feature, until aggressive high-pressure spraying pushes debris deeper into those tiny voids. This can lead to clogs that diminish permeability and contribute to weed growth, weed seeds, and even decay.
According to industry experts, improper power washing can cause more harm than good for porous surfaces. For example, experts at Pressure Washers Pro mention that using too high a pressure setting can force dirt and contaminants further into the paver joints, making cleaning even more difficult over time. The goal is to clean thoroughly without destroying the integrity of the material.
Early in my own journey, I made a costly mistake: I used my standard pressure washer at full blast, thinking that more pressure meant better cleaning. Instead, I embedded grime deeper into the pavers—an experience that taught me a vital lesson about tailored techniques and equipment.
If you’ve ever faced this problem, you know how disheartening it can be. But don’t worry—there are ways to powerwash your permeable pavers safely and effectively.* To help you avoid my pitfall, I’ll guide you through five essential tips that will keep your surface drainage intact while achieving a spotless clean.
Ready to transform your outdoor space without risking clogging? Let’s dive into the methods that will make your power washing both effective and sustainable.
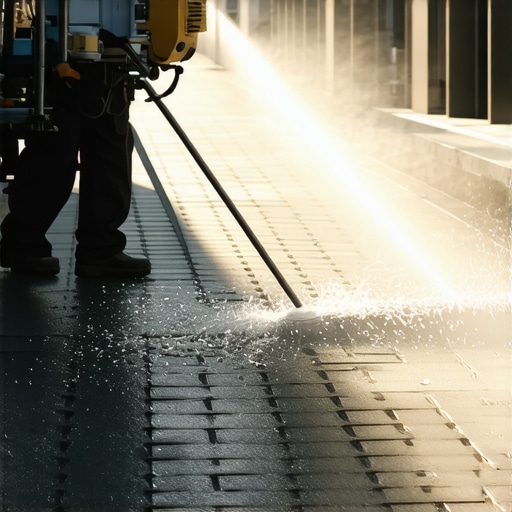
Prepping Your Equipment for Gentle Cleaning
Start by choosing a pressure washer with adjustable settings; think of it as tuning a guitar—too high, and you risk damaging the strings or surface, too low, and dirt remains stubborn. Set your pressure to a moderate level, roughly 1500-2000 PSI, similar to gently rinsing a delicate surface rather than scrubbing with force. Attach a wide-angle nozzle, such as a 25-degree tip, to disperse water evenly, reducing the risk of pushing debris into the tiny pores of your pavers. As I did during my last project, switching to a lower pressure saved me from deepening grime and avoided costly repairs. For even better results, consider using a dedicated soft wash or surface-cleaning attachment, which evenly distributes water and minimizes surface impact. Check this top equipment guide to choose the right tools for gentle yet effective cleaning.
Applying Eco-Friendly Degreasers for Deep Cleaning
Next, opt for an eco-friendly degreaser that can break down grease, oil, and organic matter without clogging pores or harming plants—a crucial step when cleaning porous surfaces. Dilute your degreaser following the manufacturer’s instructions, then apply it evenly across the surface using a low-pressure spray or garden sprayer, much like applying sunscreen evenly before a day at the beach. Let it sit for 10-15 minutes to loosen embedded grime. During my first trial, I learned that letting the cleaner sit without rinsing immediately allowed the solution to penetrate and dissolve stubborn residues effectively, extending the life of my pavers. For a variety of eco-friendly options, see this guide to eco-friendly cleaning mixes. Remember, avoid using harsh chemicals like bleach that can damage the paver material and surrounding landscape.
Using Gentle Water Flow to Clear Out Debris
After applying the cleaner, switch to a low-pressure rinse. Imagine you’re watering delicate flowers—gentle, widespread water flow that cleans without forcing dirt into the tiny pores. Hold your wand at a consistent distance—about 12-18 inches from the surface—and move methodically across the area. This approach dislodges loose dirt and organic matter without embedding debris deeper into the pavers. I discovered how effective this was during a weekend project when I saw soil and leaves lift away effortlessly, leaving the surface cleaner and more permeable. For tips on optimizing your water flow and nozzle choice, see this comprehensive power washing techniques. Avoid high-velocity streams that can carve out joints or displace gravel, which would lead to future clogging issues.
Spot Treating Stubborn Areas
For persistent stains or organic buildup, apply a targeted solution using a less aggressive sprayer or even a brush. Think of this step as spot cleaning a stain on your favorite shirt—precise, controlled, and gentle. Gently scrub with a soft brush or use a low-pressure spray to lift stubborn grime. During my experience, I focused extra attention on shaded spots where mold tend to grow, and the results were noticeably cleaner. This method prevents the need for excessive pressure that can disturb the paver joints or damage the surface. For more detailed strategies on effective spot cleaning, refer to this guide on spot treatment techniques.
Final Rinse and Post-Cleaning Checks
Finally, do a thorough rinse with a broad spray pattern at low pressure to wash away residual debris and cleaner residues. Think of it as rinsing a paintbrush—gentle, thorough, and ensuring no residue remains that could clog the pores later. Walk slowly across your surface, maintaining consistent distance for even coverage. Once completed, inspect joints and corners manually, using a soft brush or broom to dislodge any remaining debris that water alone couldn’t remove. After my last cleaning, the driveway looked fresh, and drainage improved noticeably. Check this final check list for tips on confirming your cleaning is complete without risking damage or clogging.Many homeowners assume that blasting away dirt with a powerful pressure washer is a straightforward task, but this oversimplification can lead to costly mistakes. A common misconception is that higher PSI always equals better cleaning — in reality, exceeding recommended pressure levels, especially on delicate or porous surfaces like permeable pavers, can cause damage or embed debris deeper into the material. Experts highlight that optimal pressure setting depends not just on the surface but also on its material properties; using overly aggressive settings risks clogging pores and deteriorating the surface integrity. Additionally, many neglect the importance of proper nozzle selection. For instance, a narrow, high-pressure nozzle might seem efficient but can actually dislodge joint material or force debris into pores, creating clogs over time. When cleaning, the focus should be on the technique and equipment suited for the surface, not solely on brute force. Moreover, some assume that chemical cleaners aren’t necessary, but applying eco-friendly degreasers tailored for porous surfaces ensures deeper cleaning without risking pore clogging, as shown in recent industry analyses. Another advanced mistake involves neglecting post-cleaning inspections. Without manually checking joint and joint areas, homeowners might miss residual debris that could cause future drainage problems. To truly master power washing, understanding these nuanced aspects is key—otherwise, you risk undoing your efforts or damaging your surfaces. For advanced strategies, consult comprehensive guides like this one on power washer tools and techniques for profound results. Have you ever fallen into this trap? Let me know in the comments.Keeping your power washing equipment in peak condition is essential for consistent, professional results. I personally recommend investing in high-quality, adjustable pressure washers like models from Simpson or Karcher that allow fine-tuning of PSI and GPM, helping you avoid damage and extend machine lifespan. Regularly checking hoses and nozzles for signs of wear, such as cracks or clogs, ensures you won’t face unexpected downtime—trust me, replacing a damaged wand is far easier than dealing with a broken pump mid-job. Using eco-friendly degreasers, like those outlined in this top guide, helps prevent chemical buildup that can clog filters and spray tips over time. Additionally, maintaining surge tanks and filters by flushing water lines monthly, especially after intensive cleaning projects, minimizes mineral deposits and debris accumulation. Incorporating smart maintenance routines now means fewer costly repairs later, and with the advancements in smart sensors—detailed in this sensor checklist—I predict more professionals will adopt automated diagnostics. Staying proactive not only preserves your equipment’s performance but also ensures safety on every job site.
How do I keep my power washer functioning over time? I schedule regular maintenance checks, replace worn parts promptly, and use proper cleaning solutions suited for each surface. For example, regularly inspecting and replacing high-pressure hoses helps avoid dangerous blowouts, and using high-quality nozzles reduces wear and tear on your machine. Also, avoiding excessive pressure settings prevents unnecessary strain on your pump, prolonging its life. For more detailed strategies, this guide on optimal settings provides excellent insights.
To truly optimize your equipment, I suggest trying out lightweight, durable carbon-fiber wands. These tools reduce fatigue during long jobs and help maintain consistent spray angles, improving cleaning efficiency. Check out this recent review—they’ve transformed my workflow. Remember, consistent maintenance not only extends the lifespan of your tools but also improves your results, delivering that professional shine clients expect. Investing in regular checks and quality accessories will pay off by reducing downtime and repair costs, making your power wash operation far more sustainable over the years.
3 Mistakes I Swear I Won’t Revisit in Power Washes
One hard-earned lesson was realizing that increasing pressure doesn’t always mean better cleaning—especially on delicate permeable pavers. I once used a high PSI setting that caused tiny joint materials to dislodge, leading to future clogging and drainage issues. Another insight was neglecting nozzle selection, which can make or break your cleaning’s gentleness; I learned that a wide-angle nozzle distributes water more evenly, preventing surface damage. Finally, skipping post-cleanup inspections meant residual debris was hiding in corners, only to cause problems down the line. These experiences pushed me to adopt a more cautious, informed approach, transforming my results and saving me costly repairs.