Have you ever sprayed away grime only to find those stubborn stains still glaring back at you? I remember my first attempt at power washing my driveway. I thought I was doing everything right — until I saw the uneven patches and streaks. It was a lightbulb moment that I needed to learn proven techniques, not just spray and hope. Since then, I’ve realized that trustworthy results come from understanding the right strategies, equipment, and timing. If you’re tired of wasting time and water on ineffective cleaning, then this post is your guide to mastering power washing in 2024.
Why Proper Power Washing Matters More Than Ever
Power washing isn’t just about making surfaces look good. It’s about protecting your property, enhancing curb appeal, and even increasing home value. In fact, a professional-grade clean can boost your home’s worth by up to 2%, according to the National Association of Realtors. Yet, many DIY enthusiasts fall into the trap of using too much pressure, wrong nozzles, or skipping crucial prep steps. These mistakes not only waste resources but also risk damaging surfaces, leading to costly repairs. Early in my journey, I made the mistake of rushing into a job without understanding the importance of the right equipment and techniques. That oversight cost me time, money, and a lot of frustration.
Have You Faced This Problem Too?
If you’ve ever been disappointed with your power wash results or worried about causing damage, you’re not alone. The good news is, with the right guidance, you can achieve professional results without breaking the bank or risking your surfaces. I’ll walk you through proven strategies, from selecting top equipment to mastering effective techniques, so you can trust your power washing efforts in 2024.
What’s Coming Next
In the sections ahead, we’ll dive into the most essential tips and tricks for trustworthy power washing results. Whether you’re a beginner or looking to upgrade your skills, I’ll share insights I’ve gathered from years of experience and industry experts. Ready to transform your cleaning game? Let’s get started with the fundamentals that make all the difference.
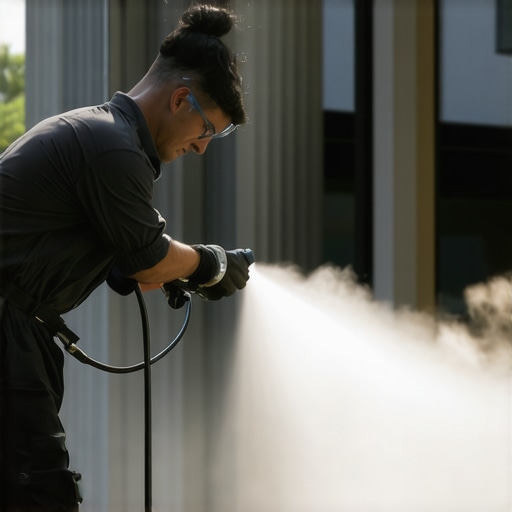
Choose the Right Equipment
Start by selecting equipment tailored for the task. A high-quality pressure washer with adjustable PSI (pounds per square inch) and GPM (gallons per minute) allows you to control pressure and flow, minimizing surface damage while maximizing cleaning power. For delicate surfaces like wood or painted surfaces, opt for lower PSI settings and softer nozzles. For tougher stains on concrete or brick, higher PSI is necessary. To ensure you’re equipped with the best tools, check out this ultimate equipment guide that highlights top models and accessories for professional results.
Invest in the Proper Nozzles
Nozzles determine the spray pattern and pressure distribution. Using the wrong nozzle can lead to uneven cleaning or surface damage. A 25-degree nozzle offers a broad spray ideal for general cleaning, while a 15-degree nozzle provides focused pressure for stubborn grime. For gentle rinsing, use a 40-degree nozzle. Remember, switching nozzles based on the surface and stain type is crucial. I once tried to blast away moss on my patio with a narrow nozzle, which caused some pitting in the concrete. Learning to match the nozzle to the task saved me future repairs. For a comprehensive list of nozzle uses, see this nozzle guide.
Master the Technique of Proper Spray Angles
Hold the wand at a consistent angle, typically 45 degrees to the surface, and keep the spray moving in a sweeping motion. Stopping in one spot can cause damage or streaks. I once spent hours trying to clean my driveway, but I wasn’t moving the wand correctly — leading to streaks and uneven patches. When I started maintaining a steady distance and motion, the results became noticeably better. Think of it like painting a wall: quick, even strokes produce a uniform finish. Practice makes perfect, so don’t rush your strokes. For detailed tips, check out techniques for smooth spray.
Adjust Pressure Based on Surface
Not all surfaces require the same pressure. Use lower PSI for soft materials like wood, painted surfaces, or windows. Higher PSI is reserved for concrete and brick. Always test a small, inconspicuous area first. I once set my PSI too high while cleaning my fence, causing paint to peel. Learning to dial down the pressure saved me from costly repainting. Remember, the goal is to loosen dirt without damaging the surface. A helpful tip is to start with the lowest effective pressure and increase gradually if needed. You can find more detailed pressure settings in this pressure adjustment guide.
Prep Surfaces Before Power Washing
Before hitting surfaces with water, remove loose debris, leaves, and dirt. For stubborn stains, pre-treat with an appropriate detergent or cleaning solution. I’ve found that applying a cleaning solution with a brush or sprayer, then letting it sit for 5-10 minutes, significantly improves results. Use eco-friendly detergents to prevent environmental harm. Proper prep minimizes the need for excessive water pressure, protecting surfaces and ensuring thorough cleaning. For advanced prep techniques, see this preparation strategy article.
Maintain Your Equipment Regularly
Keep nozzles clean and replace worn parts promptly. Regular maintenance prevents clogs and ensures optimal performance. I once ignored my pressure washer’s nozzle, which became clogged and reduced pressure. Cleaning the nozzle with a fine wire brush restored proper spray and saved me from buying a new one. Always inspect hoses, connections, and filters before each use. Proper maintenance is the backbone of consistent, trustworthy results. For detailed maintenance routines, visit this equipment maintenance page.
Many enthusiasts believe that more pressure always equals better cleaning, but in the world of power washing, this is a common misconception. In fact, applying excessive PSI can cause surface damage, especially on delicate materials like wood or painted surfaces. The myth that higher pressure guarantees a spotless clean often leads to costly repairs or surface deterioration. Instead, understanding the nuances of equipment settings and surface compatibility is crucial. For example, a study by industry experts emphasizes that proper technique and equipment calibration are more impactful than raw power alone. To master this, visit this resource for proven strategies that boost results without risking damage.
Why Do Many Power Washers Fail to Deliver Consistent Results?
A hidden trap many fall into is neglecting surface-specific adjustments. Using the same nozzle and pressure settings across different materials is a recipe for uneven cleaning and damage. For instance, what works on concrete might ruin a wooden fence. Adjusting nozzle angles and PSI according to surface type is an advanced skill that separates amateurs from professionals. A common mistake is skipping the testing phase on small, hidden areas before tackling the entire surface, which can result in irreversible harm. Incorporate this step into your routine and see a significant improvement in outcomes. For detailed advice, check out this guide.
Is Using Detergents Always Necessary or Could It Be a Waste?
Another myth is that detergents are essential for all jobs. While pre-treatment can be highly effective for stubborn stains, over-reliance on chemicals can lead to unnecessary environmental impact and increased costs. An advanced approach involves strategic pre-soaking for tough stains and skipping detergents on lighter jobs. This not only saves money but also reduces chemical runoff. Interestingly, recent studies suggest that mechanical action combined with proper nozzle selection can sometimes outperform chemical cleaners in efficiency. To learn more about optimizing your cleaning process, visit this article.
What About Equipment Maintenance and Its Impact on Results?
Many overlook that equipment maintenance is vital for trustworthy results. Worn-out nozzles, clogged filters, or leaking hoses reduce pressure and effectiveness, yet these issues are often ignored until performance drops significantly. Regular inspection and cleaning of components ensure consistent results and prolong equipment lifespan. A surprising fact is that a simple nozzle cleaning can restore up to 20% more pressure, dramatically improving cleaning efficiency. For a comprehensive maintenance routine, see this detailed guide. Remember, a well-maintained machine is your best asset for trustworthy, professional-looking results.
Keeping your power washing equipment in top condition is crucial for achieving consistent, professional results over time. The key lies in selecting the right tools, performing routine maintenance, and understanding how to troubleshoot issues early. In this section, I’ll share specific tools I trust and methods I use personally to ensure my equipment stays reliable, efficient, and ready for any cleaning challenge.
Investing in Quality Nozzles and Hoses
One of the most underrated but impactful tools in my arsenal is a set of high-quality, corrosion-resistant nozzles. I prefer brass nozzles over plastic because they withstand wear and tear longer, maintaining consistent spray patterns. For hoses, I choose reinforced rubber models with metal fittings—these resist kinks and leaks better, especially during extended work sessions. Regularly inspecting and cleaning nozzles with a fine wire brush prevents clogs that reduce pressure and cleaning power. This practice alone can restore up to 20% of lost performance, which is a game-changer for stubborn jobs.
Power Washer Detergent Injectors and Pre-Treatment Tools
Pre-treating surfaces with the right detergents makes a noticeable difference in cleaning efficiency. I rely on a professional-grade chemical injector that connects directly to my pressure washer. This setup allows me to apply cleaning solutions evenly and precisely, saving time and reducing chemical waste. For stubborn stains, I use a foam cannon attachment, which helps the detergent cling to vertical surfaces longer. This method minimizes runoff and maximizes impact, especially on tough grime or moss. Incorporating these tools into your routine ensures long-term effectiveness and reduces the need for multiple passes.
Routine Maintenance for Longevity
To keep everything working smoothly, I follow a strict maintenance schedule. After each job, I flush the system with clean water to clear out debris and prevent buildup. Monthly, I inspect hoses for cracks or leaks and replace worn-out O-rings or seals. I also lubricate moving parts, like trigger guns and spray wands, with manufacturer-recommended lubricants. For deep cleaning, I disassemble nozzles and filters, soaking them in vinegar or specialized cleaning solutions. These small but consistent steps extend the lifespan of my equipment and ensure trustworthy results every time.
How do I maintain my power washing tools over time?
Regular check-ups are essential. I recommend keeping a maintenance log to track inspections and replacements. Using manufacturer-approved parts and oils guarantees compatibility and performance. Investing in a pressure gauge and flow meter helps you monitor system performance and catch issues early. Additionally, storing equipment in a clean, dry environment prevents corrosion and damage. Over time, developing this routine has saved me hundreds of dollars in repairs and downtime, making my investment in equipment pay off in trustworthiness and efficiency.
Looking ahead, advancements like smart pressure washers with diagnostic features and automated maintenance alerts are on the horizon. These innovations aim to simplify upkeep and prolong equipment life even further. For now, sticking to proven routines and trusted tools is your best strategy. I encourage you to try implementing a comprehensive maintenance checklist today—your future self will thank you for the saved time and consistent results. For detailed strategies, check out this guide.
The Hardest Lesson I Learned About Power Washing
One of my biggest lightbulb moments was realizing that surface-specific adjustments are crucial. Using the same pressure and nozzle on a wooden fence and a concrete driveway led to damage on my fence and missed spots on the driveway. Now, I take the time to test small areas and adjust my settings accordingly, which saves me time and money in repairs. Trust me, understanding your surfaces is the secret to trustworthy results.
My Essential Toolkit for Power Washing Success
Over the years, I’ve come to rely on a few key tools: brass nozzles for durability, a reinforced hose for reliability, and a chemical injector for even detergent application. These tools help me achieve professional results without the hassle. I also swear by a pressure gauge to monitor performance and prevent damage. Check out this comprehensive equipment guide to build your own arsenal.
Don’t Wait—Start Power Washing Today
If you’re ready to elevate your cleaning game and achieve results you can trust, now is the time to act. Power washing is a game-changer for curb appeal and property protection. Remember, the key is not just raw power but technique, equipment, and maintenance. Take the first step, experiment with settings, and enjoy the satisfaction of a job well done. Your home will thank you, and you’ll feel more confident in your skills every time you power wash.
What’s been your biggest challenge with power washing? Let me know below!
Reading through this post really resonates with my own experience when I first started power washing. I learned the hard way that using too high pressure on delicate surfaces like wooden decks not only failed to clean effectively but also caused damage. Now, I always do a test patch and adjust my PSI accordingly. One thing I’ve found helpful is investing in a good quality pressure washer with adjustable settings — it makes a big difference in controlling the flow and pressure. Also, pre-treating stubborn stains with eco-friendly detergents before washing has saved me time and prevented damage. Does anyone have tips on effectively pre-treating surfaces without using harsh chemicals? I’m always looking for safer, eco-friendly options that work well.
This post really hit home for me, especially the part about surface-specific adjustments. I’ve learned through my own experience that rushing into a power washing job without testing on small, hidden areas can cause more harm than good. It’s tempting to want quick results, but patience with proper technique makes all the difference. One challenge I regularly face is balancing pressure with cleaning effectiveness, especially on surfaces like painted wood or delicate siding. I’ve started using lower PSI and wider nozzles on sensitive areas, which drastically reduces risk of damage. How do others decide the right pressure for different surfaces, particularly when dealing with mixed materials in a single project? Would love to hear your thoughts or tips for fine-tuning pressure settings in complex situations.
I really appreciate the emphasis on surface-specific adjustments for power washing. Too often, I see DIYers applying the same pressure across different materials and ending up with damaged surfaces or missed spots. I’ve found that investing time in testing different nozzles and pressure levels pays off in the long run. One thing I learned is to always start with the lowest effective PSI and gradually increase only if necessary. Also, using a wide-angle nozzle on softer surfaces helps distribute pressure more evenly and prevents damage. Has anyone tried using thermal or soap-enhanced power washing for really stubborn stains? I’m curious if combining heat or special detergents could provide better results without risking surface harm. Would love to hear everyone’s experiences or recommendations with these advanced techniques.